05. Deploy the Model
Deploying your own model
Once you’ve trained your own model in DIGITS, you can download that model and run it on the same live camera project to test it on the Jetson. The following instructions are a subset of the instructions you can find in Nvidia’s Two Days to a Demo setup.
Downloading Model Snapshot to Jetson
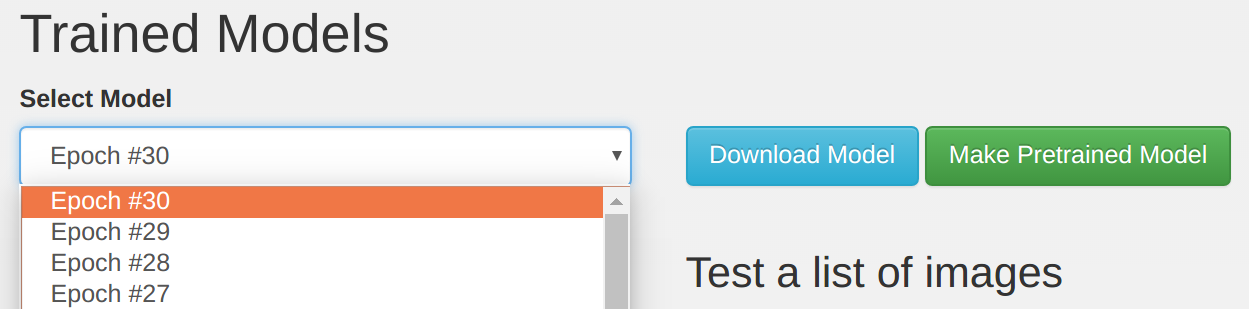
Now that we confirmed the trained model is working in DIGITS, let's download and extract the model snapshot to Jetson. From the browser on your Jetson TX1/TX2, navigate to your DIGITS server and the model you trained, “GoogleNet-ILSVRC12-subset” in this example. Under the Trained Models section, select the desired snapshot from the drop-down (usually the one with the highest epoch) and click the Download Model button.
Alternatively, if your Jetson and DIGITS server aren't accessible from the same network, you can use the step above to download the snapshot to an intermediary machine and then use SCP or USB stick to copy it to Jetson.
Then extract the archive with a command similar to:
tar -xzvf 20170524-140310-8c0b_epoch_30.0.tar.gzNext we will load our custom snapshot into TensorRT, running on the Jetson.
Loading Custom Models on Jetson
The imagenet-console and imagenet-camera programs that we used before also accept extended command line parameters for loading a custom model snapshot. Set the $NET variable below to the path to your extracted snapshot:
$ NET=networks/GoogleNet-ILSVRC12-subset
$ ./imagenet-console bird_0.jpg output_0.jpg \
--prototxt=$NET/deploy.prototxt \
--model=$NET/snapshot_iter_184080.caffemodel \
--labels=$NET/labels.txt \
--input_blob=data \
--output_blob=softmax
As before, the classification and confidence will be overlayed to the output image. When compared to the output of the original network, the re-trained GoogleNet-12 makes similar classifications to the original GoogleNet-1000:
The extended command line parameters above also load custom classification models with imagenet-camera.
Live camera demo with downloaded model
Deploy The Model